OOP's overview
Object-oriented programming (OOP) is the core ingredient of the .NET framework. OOP is so important that, before embarking on the road to .NET, you must understand its basic principles and terminology to write even a simple program. The fundamental idea behind OOP is to combine into a single unit both data and the methods that operate on that data; such units are called an object. All OOP languages provide mechanisms that help you implement the object-oriented model. They are encapsulation, inheritance, polymorphism and reusability. Let's now take a brief look at these concepts.
Encapsulation
Encapsulation binds together code and the data it manipulates and keeps them both safe from outside interference and misuse. Encapsulation is a protective container that prevents code and data from being accessed by other code defined outside the container.
Inheritance
Inheritance is the process by which one object acquires the properties of another object. A type derives from a base type, taking all the base type members fields and functions. Inheritance is most useful when you need to add functionality to an existing type. For example all .NET classes inherit from the System.Object class, so a class can include new functionality as well as use the existing object's class functions and properties as well.
Polymorphism
Polymorphism is a feature that allows one interface to be used for a general class of action. This concept is often expressed as "one interface, multiple actions". The specific action is determined by the exact nature of circumstances.
Reusability
Once a class has been written, created and debugged, it can be distributed to other programmers for use in their own program. This is called reusability, or in .NET terminology this concept is called a component or a DLL. In OOP, however, inheritance provides an important extension to the idea of reusability. A programmer can use an existing class and without modifying it, add additional features to it.
Simple "Hello World" C# Program
This simple one-class console "Hello world" program demonstrates many fundamental concepts throughout this article and several future articles.
C# code
using System;
namespace oops
{
{
//class definition
public class SimpleHelloWorld
{
//Entry point of the program
static void Main(string[] args)
{
//print Hello world"
Console.WriteLine("Hello World!");
}
}
}
So SimpleHelloWorld is the name of the class that contains the Main () method. On line 1 , a using directive indicates to the compiler that this source file refers to classes and constructs declared within the System namespace. Line 6 with the public keyword indicates the program accessibility scope for other applications or components.
At line 7 there appears an opening curly brace ("{") which indicates the beginning of the SimpleHelloWorld class body. Everything belongs to the class, like fields, properties and methods appear in the class body between the opening and closing braces. The purpose of the Main () method is to provide an entry point for application execution.
The static keyword in the Main () method states that this method would be executed without instantiating the class.
Compiling the Program
You can compile a C# program into either an assembly or a module. If the program has one class that contains a Main () method then it can be compiled directly into an assembly. This file has an ".exe" extension. A program with no Main() method can be compiled into a module as in the following:
csc /target:module "program name"
You can then compile this program by F9 or by simply running the C# command line compiler (csc.exe) against the source file as the following:
csc oops.cs
Classes and Objects
Classes are special kinds of templates from which you can create objects. Each object contains data and methods to manipulate and access that data. The class defines the data and the functionality that each object of that class can contain.
A class declaration consists of a class header and body. The class header includes attributes, modifiers, and the class keyword. The class body encapsulates the members of the class, that are the data members and member functions. The syntax of a class declaration is as follows:
Attributes accessibility modifiers class identifier: baselist { body }
Attributes provide additional context to a class, like adjectives; for example the Serializable attribute. Accessibility is the visibility of the class. The default accessibility of a class is internal. Private is the default accessibility of class members. The following table lists the accessibility keywords;
|
Keyword
|
Description
|
|
public
|
Public
class is visible in the current and referencing assembly.
|
|
private
|
Visible
inside current class.
|
|
protected
|
Visible
inside current and derived class.
|
|
Internal
|
Visible
inside containing assembly.
|
|
Internal
protected
|
Visible
inside containing assembly and descendent of the current class.
|
Modifiers refine the declaration of
a class. The list of all modifiers defined in the table are as follows;
|
Modifier
|
Description
|
|
sealed
|
Class
can't be inherited by a derived class.
|
|
static
|
Class
contains only static members.
|
|
unsafe
|
The
class that has some unsafe construct likes pointers.
|
|
Abstract
|
The
instance of the class is not created if the Class is abstract.
|
The baselist is the inherited class.
By default, classes inherit from the System.Object type. A class can inherit
and implement multiple interfaces but doesn't support multiple inheritances.
Step-by-step Tutorial for Creating a Class
Step-by-step Tutorial for Creating a Class
- Open Visual Studio 2010 from start menu.
- Go to "File" > "New" >
"Project...", select "Console Application" in the
right pane and provide the name "oops" for the project.
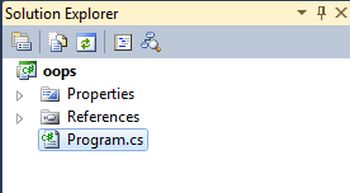
- Then in the Solution Explorer, you will notice some
files that are automatically created as:
- You can also write your own code in the default
program.cs file that is created but it is a good programming practice to
create a new class.
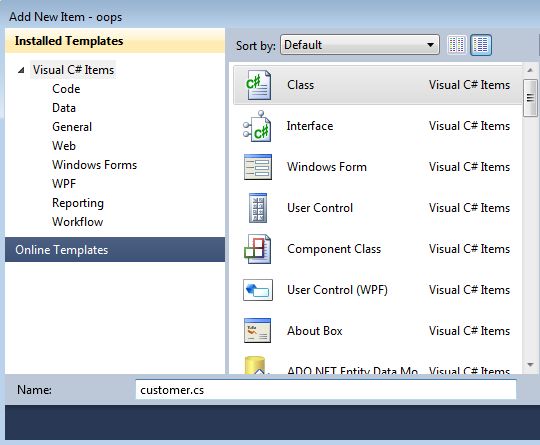
- For adding a new class, right-click over the project
name (oops) in the Solution Explorer, then click "Add" >
"Class". Give the name to the class "customer" as in
the following;
- When you open the customer.cs class. you will find some
default-generated code as in the following;
C# code
using System;
using System.Collections.Generic;
using System.Linq;
using System.Text;
using System;
using System.Collections.Generic;
using System.Linq;
using System.Text;
namespace oops
{
class customer
{
}
}
{
class customer
{
}
}
Note: the C# console application
project must require a single entry point Main () function that is already
generated in the program class. For example if you add a new customer class and
want to define one or more Main () entry points here then .NET will throw an
error of multiple entry points. So it is advisable to delete or exclude the
program.cs file from the solution.
So here in this example the customer class defines fields such as CustID, Name and Address to hold information about a particular customer. It might also define some functionality that acts upon the data stored in these fields.
C# code
using System;
So here in this example the customer class defines fields such as CustID, Name and Address to hold information about a particular customer. It might also define some functionality that acts upon the data stored in these fields.
C# code
using System;
namespace oops
{
class customer
{
// Member Variables
public int CustID;
public string Name;
public string Address;
{
class customer
{
// Member Variables
public int CustID;
public string Name;
public string Address;
//constuctor for initializing fields
customer()
{
CustID=1101;
Name="Tom";
Address="USA";
}
customer()
{
CustID=1101;
Name="Tom";
Address="USA";
}
//method for displaying customer records
(functionality)
public void displayData()
{
Console.WriteLine("Customer="+CustID);
Console.WriteLine("Name="+Name);
Console.WriteLine("Address="+Address);
}
// Code for entry point
}
}
At line 9, we are defining a constructor of the customer class for initializing the class member fields. The constructor is a special function that is automatically called when the customer class object is created (instantiated). And at line 11 we are printing these fields to the console by creating a user defined method displayData().
You can then instantiate an object of this class to represent one specific customer, set the field value for that instance and use its functionality, as in:
C# code
class customer
{
// class members code
//Entry point
static void Main(string[] args)
{
// object instantiation
customer obj = new customer();
static void Main(string[] args)
{
// object instantiation
customer obj = new customer();
//Method calling
obj.displayData();
obj.displayData();
//fields calling
Console.WriteLine(obj.CustID);
Console.WriteLine(obj.Name);
Console.WriteLine(obj.Address);
}
}
Here you use the keyword new to declare the customer class instance. This keyword creates the object and initializes it. When you create an object of the customer class, the .NET framework IDE provides a special feature called Intellisense that provides access to all the class member fields and functions automatically. This feature is invoke when the "." Operator is put right after the object, as in the following;
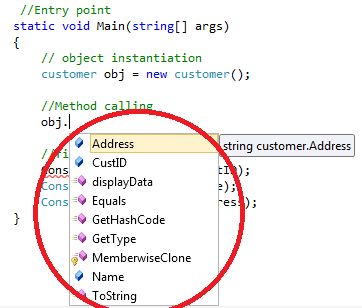
Image 1.1 Intellisense feature
Normally, as the program grows in size and the code becomes more complex, the Intellisense feature increases the convenience for the programmer by showing all member fields, properties and functions.
Multiple Class Declaration
Sometimes circumstances require multiple classes to be declared in a single namespace. So in that case it is not mandatory to add a separate class to the solution, instead you can attach the new class into the existing program.cs or another one as in the following;
C# code
Console.WriteLine(obj.CustID);
Console.WriteLine(obj.Name);
Console.WriteLine(obj.Address);
}
}
Here you use the keyword new to declare the customer class instance. This keyword creates the object and initializes it. When you create an object of the customer class, the .NET framework IDE provides a special feature called Intellisense that provides access to all the class member fields and functions automatically. This feature is invoke when the "." Operator is put right after the object, as in the following;
Image 1.1 Intellisense feature
Normally, as the program grows in size and the code becomes more complex, the Intellisense feature increases the convenience for the programmer by showing all member fields, properties and functions.
Multiple Class Declaration
Sometimes circumstances require multiple classes to be declared in a single namespace. So in that case it is not mandatory to add a separate class to the solution, instead you can attach the new class into the existing program.cs or another one as in the following;
C# code
using System;
namespace oops
{
class Program
{
{
class Program
{
public void
MainFunction()
{
Console.WriteLine("Main class");
}
static void Main(string[] args)
{
//main class instance
Program obj = new Program();
obj.MainFunction();
{
Console.WriteLine("Main class");
}
static void Main(string[] args)
{
//main class instance
Program obj = new Program();
obj.MainFunction();
//other class instace
demo dObj=new demo();
dObj.addition();
}
}
demo dObj=new demo();
dObj.addition();
}
}
class demo
{
int x = 10;
int y = 20;
int z;
{
int x = 10;
int y = 20;
int z;
public void
addition()
{
z = x + y;
Console.WriteLine("other class in Namespace");
Console.WriteLine(z);
}
}
}
{
z = x + y;
Console.WriteLine("other class in Namespace");
Console.WriteLine(z);
}
}
}
Here in this example, we are creating an extra class "demo" in the program.cs file at line 12 and finally we are instantiating the demo class with the program class inside the Main() entry in lines 6 to 11. So it doesn't matter how many classes we are defining in a single assembly.
Partial classes
Typically, a class will reside entirely in a single file. However, in situations where multiple developers need access to the same class, then having the class in multiple files can be beneficial. The partial keywords allow a class to span multiple source files. When compiled, the elements of the partial types are combined into a single assembly.
There are some rules for defining a partial class as in the following;
- A partial type must have the
same accessibility.
- Each partial type is preceded
with the "partial" keyword.
- If the partial type is sealed
or abstract then the entire class will be sealed and abstract.
In the
following example we are adding two files, partialPart1.cs and
partialPart2.cs, and declare a partial class, partialclassDemo, in both
classes.
partialPart1.cs
using System;
partialPart1.cs
using System;
namespace oops
{
public partial class partialclassDemo
{
public void method1()
{
Console.WriteLine("method from part1 class");
}
}
}
partialPart2.cs
{
public partial class partialclassDemo
{
public void method1()
{
Console.WriteLine("method from part1 class");
}
}
}
partialPart2.cs
using System;
namespace oops
{
public partial class partialclassDemo
{
public void method2()
{
Console.WriteLine("method from part2 class");
}
}
}
And finally we are creating an instance of the partialclassDemo in the program.cs file as the following:
Program.cs
using System;
{
public partial class partialclassDemo
{
public void method2()
{
Console.WriteLine("method from part2 class");
}
}
}
And finally we are creating an instance of the partialclassDemo in the program.cs file as the following:
Program.cs
using System;
namespace oops
{
class Program
{
static void Main(string[] args)
{
//partial class instance
partialclassDemo obj = new partialclassDemo();
obj.method1();
obj.method2();
}
}
}
Static classes
A static class is declared using the "static" keyword. If the class is declared as static then the compiler never creates an instance of the class. All the member fields, properties and functions must be declared as static and they are accessed by the class name directly not by a class instance object.
C# code
{
class Program
{
static void Main(string[] args)
{
//partial class instance
partialclassDemo obj = new partialclassDemo();
obj.method1();
obj.method2();
}
}
}
Static classes
A static class is declared using the "static" keyword. If the class is declared as static then the compiler never creates an instance of the class. All the member fields, properties and functions must be declared as static and they are accessed by the class name directly not by a class instance object.
C# code
using System;
namespace oops
{
static class staticDemo
{
//static fields
static int x = 10, y;
{
static class staticDemo
{
//static fields
static int x = 10, y;
//static method
static void calcute()
{
y = x * x;
Console.WriteLine(y);
}
static void Main(string[] args)
{
//function calling directly
staticDemo.calcute();
}
}
}
Creating and accessing Class Component Library
.NET provides the capability of creating libraries (components) of a base application rather than an executable (".exe"). Instead the library project's final build version will be ".DLL" that can be referenced from other outside applications to expose its entire functionality.
Step-by-step tutorial
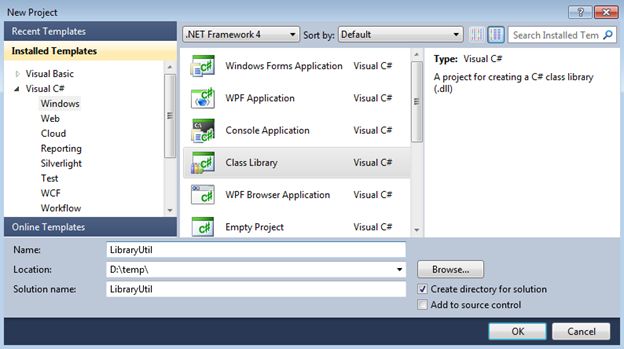
1. First create a class library based application as:
2. Then we are implementing a math class library that is responsible of calculating square root and the addition of two numbers as:
using System;
static void calcute()
{
y = x * x;
Console.WriteLine(y);
}
static void Main(string[] args)
{
//function calling directly
staticDemo.calcute();
}
}
}
Creating and accessing Class Component Library
.NET provides the capability of creating libraries (components) of a base application rather than an executable (".exe"). Instead the library project's final build version will be ".DLL" that can be referenced from other outside applications to expose its entire functionality.
Step-by-step tutorial
1. First create a class library based application as:
2. Then we are implementing a math class library that is responsible of calculating square root and the addition of two numbers as:
using System;
namespace LibraryUtil
{
public class MathLib
{
public MathLib() { }
{
public class MathLib
{
public MathLib() { }
public void
calculareSum(int x, int
y)
{
int z = x + y;
Console.WriteLine(z);
}
{
int z = x + y;
Console.WriteLine(z);
}
public void
calculareSqrt(double x)
{
double z = Math.Sqrt(x);
Console.WriteLine(z);
}
}
}
{
double z = Math.Sqrt(x);
Console.WriteLine(z);
}
}
}
3. Build this
code and you will notice that a DLL file was created, not
an executable, in the root directory of the application (path =
D:\temp\LibraryUtil\LibraryUtil\bin\Debug\ LibraryUtil.dll).
4. Now create another console based application where you utilize all the class library's functionality.
5. Then you have to add the class library dll file reference to access the declared class in the library dll. (Right-click on the Reference then "Add reference" then select the path of the dll file.)
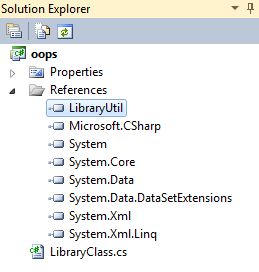
6. When you add the class library reference then you will notice in the Solution Explorer that a new LibraryUtil is added as in the following;
7. Now add the namespace of the class library file in the console application and create the instance of the class declared in the library as in the following;
4. Now create another console based application where you utilize all the class library's functionality.
5. Then you have to add the class library dll file reference to access the declared class in the library dll. (Right-click on the Reference then "Add reference" then select the path of the dll file.)
6. When you add the class library reference then you will notice in the Solution Explorer that a new LibraryUtil is added as in the following;
7. Now add the namespace of the class library file in the console application and create the instance of the class declared in the library as in the following;
using System;
using LibraryUtil; // add library namespace
namespace oops
{
public class LibraryClass
{
static void Main()
{
//library class instance
MathLib obj = new MathLib();
using LibraryUtil; // add library namespace
namespace oops
{
public class LibraryClass
{
static void Main()
{
//library class instance
MathLib obj = new MathLib();
//method populate
obj.calculareSum(2, 5);
obj.calculareSqrt(25);
}
}
}
obj.calculareSum(2, 5);
obj.calculareSqrt(25);
}
}
}
8. Finally run
the application.
Constructor and Destructor
A constructor is a specialized function that is used to initialize fields. A constructor has the same name as the class. Instance constructors are invoked with the new operator and can't be called in the same manner as other member functions. There are some important rules pertaining to constructors as in the following;
- Classes with no constructor
have an implicit constructor called the default constructor, that is
parameterless. The default constructor assigns default values to fields.
- A public constructor allows an
object to be created in the current assembly or referencing assembly.
- Only the extern modifier is
permitted on the constructor.
- A constructor returns void but
does not have an explicitly declared return type.
- A constructor can have zero or
more parameters.
- Classes can have multiple
constructors in the form of default, parameter or both.
The following
example shows one constructor for a customer class.
C# code
C# code
using System;
namespace oops
{
class customer
{
// Member Variables
public string Name;
namespace oops
{
class customer
{
// Member Variables
public string Name;
//constuctor for initializing fields
public customer(string fname, string lname)
{
Name= fname +" "+ lname;
}
//method for displaying customer records
public void AppendData()
{
Console.WriteLine(Name);
}
//Entry point
static void Main(string[] args)
{
// object instantiation
customer obj = new customer("Barack", "Obama");
public customer(string fname, string lname)
{
Name= fname +" "+ lname;
}
//method for displaying customer records
public void AppendData()
{
Console.WriteLine(Name);
}
//Entry point
static void Main(string[] args)
{
// object instantiation
customer obj = new customer("Barack", "Obama");
//Method calling
obj.AppendData();
}
}
}
Note: The moment a new statement is executed, the default constructor is called.
Static Constructor
A constructor can be static. You create a static constructor to initialize static fields. Static constructors are not called explicitly with the new statement. They are called when the class is first referenced. There are some limitations of the static constructor as in the following;
- Static constructors are
parameterless.
- Static constructors can't be
overloaded.
- There is no accessibility
specified for Static constructors.
In the
following example the customer class has a static constructor that initializes
the static field and this constructor is called when the class is referenced in
the Main () at line 26 as in the following:
C# code
C# code
using System;
namespace oops
{
class customer
{
// Member Variables
static private int x;
namespace oops
{
class customer
{
// Member Variables
static private int x;
//constuctor for static initializing fields
static customer()
{
x = 10;
}
//method for get static field
static public void getData()
{
Console.WriteLine(x);
}
//Entry point
static void Main(string[] args)
{
//static Method calling
customer.getData();
}
}
}
Destructors
The purpose of the destructor method is to remove unused objects and resources. Destructors are not called directly in the source code but during garbage collection. Garbage collection is nondeterministic. A destructor is invoked at an undetermined moment. More precisely a programmer can't control its execution; rather it is called by the Finalize () method. Like a constructor, the destructor has the same name as the class except a destructor is prefixed with a tilde (~). There are some limitations of destructors as in the following;
- Destructors are parameterless.
- A Destructor can't be
overloaded.
- Destructors are not inherited.
- Destructors can cause
performance and efficiency implications.
The following
implements a destructor and dispose method. First of all we are initializing
the fields via constructor, doing some calculations on that data and displaying
it to the console. But at line 9 we are implementing the destructor that is
calling a Dispose() method to release all the resources.
using System;
namespace oops
{
class customer
{
// Member Variables
public int x, y;
//constuctor for initializing fields
customer()
{
Console.WriteLine("Fields inititalized");
x = 10;
}
//method for get field
public void getData()
{
y = x * x;
Console.WriteLine(y);
}
//method to release resource explicitly
public void Dispose()
{
Console.WriteLine("Fields cleaned");
x = 0;
y = 0;
}
//destructor
~customer()
{
Dispose();
}
//Entry point
static void Main(string[] args)
{
//instance created
customer obj = new customer();
obj.getData();
}
}
}
At line 12 when the instance is created, fields are initialized but it is not necessary that at the same time the destructor is also called. Its calling is dependent on garbage collection. If you want to see the destructor being called into action then put a breakpoint (by F9) at line 10 and compile the application. The CLR indicates its execution at the end of the program by highlighting line 10 using the yellow color.
Function Overloading
Function overloading allows multiple implementations of the same function in a class. Overloaded methods share the same name but have a unique signature. The number of parameters, types of parameters or both must be different. A function can't be overloaded on the basis of a different return type alone.
}
}
At line 12 when the instance is created, fields are initialized but it is not necessary that at the same time the destructor is also called. Its calling is dependent on garbage collection. If you want to see the destructor being called into action then put a breakpoint (by F9) at line 10 and compile the application. The CLR indicates its execution at the end of the program by highlighting line 10 using the yellow color.
Function Overloading
Function overloading allows multiple implementations of the same function in a class. Overloaded methods share the same name but have a unique signature. The number of parameters, types of parameters or both must be different. A function can't be overloaded on the basis of a different return type alone.
using System;
namespace oops
{
class funOverload
{
public string name;
namespace oops
{
class funOverload
{
public string name;
//overloaded functions
public void setName(string last)
{
name = last;
}
public void setName(string last)
{
name = last;
}
public void
setName(string first, string
last)
{
name = first + "" + last;
}
{
name = first + "" + last;
}
public void
setName(string first, string
middle, string last)
{
name = first + "" + middle + "" + last;
}
{
name = first + "" + middle + "" + last;
}
//Entry point
static void Main(string[] args)
{
funOverload obj = new funOverload();
static void Main(string[] args)
{
funOverload obj = new funOverload();
obj.setName("barack");
obj.setName("barack "," obama ");
obj.setName("barack ","hussian","obama");
}
}
}
At lines 3, 4 and 5 we are defining three methods with the same name but with different parameters. In the Main (), the moment you create an instance of the class and call the functions setName() via obj at lines 7, 8 and 9 then intellisense will show three signatures automatically.
Encapsulation
Encapsulation is the mechanism that binds together the code and the data it manipulates, and keeps both safe from outside interference and misuse. In OOP, code and data may be combined in such a way that a self-contained box is created. When code and data are linked together in this way, an object is created and encapsulation exists.
Within an object, code, data or both may be private or public to that object. Private code is known to and accessible only by another part of the object, that is private code or data may not be accessible by a piece of the program that exists outside the object. When the code and data is public, other portions of your program may access it even though it is defined within an object.
C# code
using System;
namespace oops
{
class Encapsulation
{
/// <summary>
/// Every member Variable and Function of the class are bind
/// with the Encapsulation class object only and safe with
/// the outside inference
/// </summary>
namespace oops
{
class Encapsulation
{
/// <summary>
/// Every member Variable and Function of the class are bind
/// with the Encapsulation class object only and safe with
/// the outside inference
/// </summary>
// Encapsulation Begin
int x;
int x;
//class constructor
public Encapsulation(int iX)
{
this.x = iX;
}
public Encapsulation(int iX)
{
this.x = iX;
}
//calculating the square
public void MySquare()
{
int Calc = x * x;
Console.WriteLine(Calc);
}
public void MySquare()
{
int Calc = x * x;
Console.WriteLine(Calc);
}
// End of Encapsulation
//Entry point
static void Main(string[] args)
{
//instance created
customer obj = new customer(20);
obj. MySquare();
}
static void Main(string[] args)
{
//instance created
customer obj = new customer(20);
obj. MySquare();
}
}
}
}
Inheritance
Inheritance is the process by which one object can acquire the properties of another object. Inheritance is a "is a kind of" relationship and it supports the concept of classification in which an object needs only define those qualities that make it unique within the class. Inheritance involves a base class and a derived class. The derived class inherits from the base class and also can override inherited members as well as add new members to extend the base class.
A base type represents the generalization, whereas a derived type represents a specification of an instance. Such as Employees that can have diverse types, such as hourly, salaried and temporary so in that case Employees is the general base class and hourly, salaried and temporary employee are specialized derived classes.
Classes can inherit from a single class and one or more interfaces. When inheriting from a class, the derived class inherits the members including the code of the base class. The important point to remember is that Constructors and Destructors are not inherited from the base class.
The syntax of inheritance is as in the following;
Class derivedClass : baseClass, Iterface1, Interface2 { body }
For example we are defining two classes, Father and Child. You notice at line 7, we are implementing inheritance by using a colon (:); at this moment all the properties belonging to the Father Class is accessible to the Child class automatically.
C# code
using System;
namespace oops
{
//Base Class
public class Father
{
public void FatherMethod()
{
Console.WriteLine("this property belong to Father");
}
}
//Derived class
public class Child : Father
{
public void ChildMethod()
{
Console.WriteLine("this property belong to Child");
}
}
class Inheritance
{
//Entry point
static void Main(string[] args)
{
Father fObj = new
Father();
fObj.FatherMethod();
//Here Child object can access both class methods
Child cObj = new Child();
cObj.FatherMethod();
cObj.ChildMethod();
}
}
}
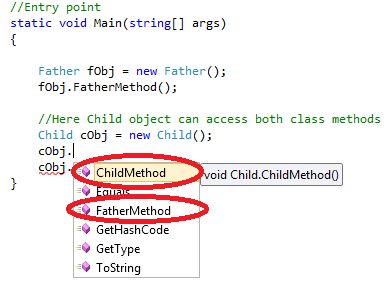
At line 11 , the Intellisense only shows the Father class functions but at line 15 to 16 the Child class object is able to access both class methods as in the following.
We can create a class in the VB.Net language or another .NET supported language and can inherit them in a C# .Net class and vice versa. But a class developed in C++ or other unmanaged environment can't be inherited in .NET.
Note: Cross-language and multiple inheritance is not supported by .NET.
Accessibility
Accessibility sets the visibility of the member to outside assemblies or derived types. The following table describes member accessibility;
fObj.FatherMethod();
//Here Child object can access both class methods
Child cObj = new Child();
cObj.FatherMethod();
cObj.ChildMethod();
}
}
}
At line 11 , the Intellisense only shows the Father class functions but at line 15 to 16 the Child class object is able to access both class methods as in the following.
We can create a class in the VB.Net language or another .NET supported language and can inherit them in a C# .Net class and vice versa. But a class developed in C++ or other unmanaged environment can't be inherited in .NET.
Note: Cross-language and multiple inheritance is not supported by .NET.
Accessibility
Accessibility sets the visibility of the member to outside assemblies or derived types. The following table describes member accessibility;
|
Modifiers
|
Outside
Assembly
|
Derived
Class
|
|
private
|
No
|
No
|
|
public
|
Yes
|
Yes
|
|
protected
|
No
|
No
|
|
internal
|
Yes
( this assembly only)
|
Yes
( this assembly only)
|
|
internal
protected
|
Yes(
this assembly only)
|
Yes
|
Constructor in Inheritance
Constructors in a base class are not inherited in a derived class. A derived class has a base portion and derived portion. The base portion initializes the base portion, and the constructor of the derived class initializes the derived portion.
The following is the syntax of a constructor in inheritance;
Accessibility modifier classname(parameterlist1) : base(parameterlist2) { body }
So the base keyword refers to the base class constructor, while parameterlist2 determines which overloaded base class constructor is called.
In the following example, the Child class's constructor calls the single-argument constructor of the base Father class;
C# code
using System;
namespace oops
{
//Base Class
public class Father
{
namespace oops
{
//Base Class
public class Father
{
//constructor
public Father()
{
Console.WriteLine("Father class constructor");
}
public Father()
{
Console.WriteLine("Father class constructor");
}
public void
FatherMethod()
{
Console.WriteLine("this property belong to Father");
}
}
{
Console.WriteLine("this property belong to Father");
}
}
//Derived class
public class Child : Father
{
public Child()
: base()
{
Console.WriteLine("child class constructor");
}
public void ChildMethod()
{
Console.WriteLine("this property belong to Child");
}
}
class Inheritance
{
//Entry point
static void Main(string[] args)
{
//Here Child object can access both class methods
Child cObj = new Child();
cObj.FatherMethod();
cObj.ChildMethod();
Console.ReadKey();
}
}
}
At line 4, we are defining a base Father Class constructor and in the derived class Child, at line 8 we are initializing it explicitly via base keyword. If we pass any parameter in the base class constructor then we have to provide them in the base block of the child class constructor.
Virtual Methods
By declaring a base class function as virtual, you allow the function to be overridden in any derived class. The idea behind a virtual function is to redefine the implementation of the base class method in the derived class as required. If a method is virtual in the base class then we have to provide the override keyword in the derived class. Neither member fields nor static functions can be declared as virtual.
C# code
using System;
namespace oops
{
class myBase
{
//virtual function
public virtual void VirtualMethod()
{
Console.WriteLine("virtual method defined in the base class");
}
}
namespace oops
{
class myBase
{
//virtual function
public virtual void VirtualMethod()
{
Console.WriteLine("virtual method defined in the base class");
}
}
class myDerived
: myBase
{
// redifing the implementation of base class method
public override void VirtualMethod()
{
Console.WriteLine("virtual method defined in the Derive class");
}
}
class virtualClass
{
static void Main(string[] args)
{
// class instance
new myDerived().VirtualMethod();
Console.ReadKey();
}
}
}
Hiding Methods
If a method with the same signature is declared in both base and derived classes, but the methods are not declared as virtual and overriden respectively, then the derived class version is said to hide the base class version. In most cases, you would want to override methods rather than hide them. Otherwise .NET automatically generates a warning.
In the following example, we are defining a VirutalMethod() in the myBase class but not overriding it in the derived class, so in that case the compiler will generate a warning. The compiler will assume that you are hiding the base class method. So to overcome that problem, if you prefix the new keyword in the derived class method then the compiler will prefer the most derived version method. You can still access the base class method in the derived class by using the base keyword.
C# code
{
// redifing the implementation of base class method
public override void VirtualMethod()
{
Console.WriteLine("virtual method defined in the Derive class");
}
}
class virtualClass
{
static void Main(string[] args)
{
// class instance
new myDerived().VirtualMethod();
Console.ReadKey();
}
}
}
Hiding Methods
If a method with the same signature is declared in both base and derived classes, but the methods are not declared as virtual and overriden respectively, then the derived class version is said to hide the base class version. In most cases, you would want to override methods rather than hide them. Otherwise .NET automatically generates a warning.
In the following example, we are defining a VirutalMethod() in the myBase class but not overriding it in the derived class, so in that case the compiler will generate a warning. The compiler will assume that you are hiding the base class method. So to overcome that problem, if you prefix the new keyword in the derived class method then the compiler will prefer the most derived version method. You can still access the base class method in the derived class by using the base keyword.
C# code
using System;
namespace oops
{
class myBase
{
//virtual function
public virtual void VirtualMethod()
{
Console.WriteLine("virtual method defined in the base class");
}
}
namespace oops
{
class myBase
{
//virtual function
public virtual void VirtualMethod()
{
Console.WriteLine("virtual method defined in the base class");
}
}
class myDerived : myBase
{
// hiding the implementation of base class method
public new void VirtualMethod()
{
Console.WriteLine("virtual method defined in the Derive class");
{
// hiding the implementation of base class method
public new void VirtualMethod()
{
Console.WriteLine("virtual method defined in the Derive class");
//still access the base class method
base.VirtualMethod();
}
}
class virtualClass
{
static void Main(string[] args)
{
// class instance
new myDerived().VirtualMethod();
Console.ReadKey();
}
}
}
Abstract Classes
C# allows both classes and functions to be declared abstract using the abstract keyword. You can't create an instance of an abstract class. An abstract member has a signature but no function body and they must be overridden in any non-abstract derived class. Abstract classes exist primarily for inheritance. Member functions, properties and indexers can be abstract. A class with one or more abstract members must be abstract as well. Static members can't be abstract.
In this example, we are declaring an abstract class Employess with a method displayData() that does not have an implementation. Then we are implementing the displayData() body in the derived class. One point to be noted here is that we have to prefixe the abstract method with the override keyword in the derived class.
C# code
using System;
namespace oops
{
//abstract class
public abstract class Employess
{
//abstract method with no implementation
public abstract void displayData();
}
namespace oops
{
//abstract class
public abstract class Employess
{
//abstract method with no implementation
public abstract void displayData();
}
//derived class
public class test : Employess
{
//abstract class method implementation
public override void displayData()
{
Console.WriteLine("Abstract class method");
}
}
class abstractClass
{
static void Main(string[] args)
{
// class instance
new test().displayData();
}
}
}
Sealed Classes
Sealed classes are the reverse of abstract classes. While abstract classes are inherited and are refined in the derived class, sealed classes cannot be inherited. You can create an instance of a sealed class. A sealed class is used to prevent further refinement through inheritance.
Suppose you are a developer of a class library and some of the classes in the class library are extensible but other classes are not extensible so in that case those classes are marked as sealed.
C# code
using System;
namespace oops
{
sealed class SealedClass
{
void myfunv();
}
namespace oops
{
sealed class SealedClass
{
void myfunv();
}
public class test : SealedClass //wrong.
will give compilation error
{
}
}
{
}
}
Interface
An interface is a set of related functions that must be implemented in a derived class. Members of an interface are implicitly public and abstract. Interfaces are similar to abstract classes. First, both types must be inherited; second, you cannot create an instance of either. Although there are several differences as in the following;
An interface is a set of related functions that must be implemented in a derived class. Members of an interface are implicitly public and abstract. Interfaces are similar to abstract classes. First, both types must be inherited; second, you cannot create an instance of either. Although there are several differences as in the following;
- An Abstract class can contain some implementations but
an interface can't.
- An Interface can only inherit other interfaces but
abstract classes can inherit from other classes and interfaces.
- An Abstract class can contain constructors and
destructors but an interface can't.
- An Abstract class contains fields but interfaces don't.
So the question is, which of these
to choose? Select interfaces because with an interface, the derived type still
can inherit from another type and interfaces are more straightforward than
abstract classes.
C# code
C# code
using System;
namespace oops
{
// interface
public interface xyz
{
void methodA();
void methodB();
}
namespace oops
{
// interface
public interface xyz
{
void methodA();
void methodB();
}
// interface method implementation
class test : xyz
{
public void methodA()
{
Console.WriteLine("methodA");
}
public void methodB()
{
Console.WriteLine("methodB");
}
}
class interfaceDemo
{
static void Main(string[] args)
{
test obj = new test();
obj.methodA();
obj.methodB();
}
}
}
class test : xyz
{
public void methodA()
{
Console.WriteLine("methodA");
}
public void methodB()
{
Console.WriteLine("methodB");
}
}
class interfaceDemo
{
static void Main(string[] args)
{
test obj = new test();
obj.methodA();
obj.methodB();
}
}
}
An interface can be inherited from
other interfaces as in the following:
C# code
C# code
public interface xyz
{
void methodA();
void methodB();
}
{
void methodA();
void methodB();
}
public interface abc : xyz
{
void methodC();
}
{
void methodC();
}
Polymorphism
Polymorphism is the ability to treat the various objects in the same manner. It is one of the significant benefits of inheritance. We can decide the correct call at runtime based on the derived type of the base reference. This is called late binding.
In the following example, instead of having a separate routine for the hrDepart, itDepart and financeDepart classes, we can write a generic algorithm that uses the base type functions. The method LeaderName() declared in the base abstract class is redefined as per our needs in 2 different classes.
C# code
using System;
namespace oops
{
public abstract class Employee
{
public virtual void LeaderName()
{
}
}
namespace oops
{
public abstract class Employee
{
public virtual void LeaderName()
{
}
}
public class hrDepart : Employee
{
public override void LeaderName()
{
Console.WriteLine("Mr. jone");
}
}
public class itDepart : Employee
{
public override void LeaderName()
{
Console.WriteLine("Mr. Tom");
}
}
{
public override void LeaderName()
{
Console.WriteLine("Mr. jone");
}
}
public class itDepart : Employee
{
public override void LeaderName()
{
Console.WriteLine("Mr. Tom");
}
}
public class financeDepart : Employee
{
public override void LeaderName()
{
Console.WriteLine("Mr. Linus");
}
}
{
public override void LeaderName()
{
Console.WriteLine("Mr. Linus");
}
}
class PolymorphismDemo
{
static void Main(string[] args)
{
hrDepart obj1 = new hrDepart();
itDepart obj2 = new itDepart();
financeDepart obj3 = new financeDepart();
{
static void Main(string[] args)
{
hrDepart obj1 = new hrDepart();
itDepart obj2 = new itDepart();
financeDepart obj3 = new financeDepart();
obj1.LeaderName();
obj2.LeaderName();
obj3.LeaderName();
obj2.LeaderName();
obj3.LeaderName();
Console.ReadKey();
}
}
}
}
}
}
No comments:
Post a Comment