A
layout defines the visual structure for a user interface, such as the UI for an activity or app widget. You can declare a layout in two
ways:
·
Declare UI elements in XML. Android provides a straightforward
XML vocabulary that corresponds to the View classes and subclasses, such as
those for widgets and layouts.
·
Instantiate layout elements at runtime. Your application can
create View and ViewGroup objects
programmatically.
An Android layout is a class that
handles arranging the way its children appear on the screen. Anything
that is a View (or inherits from View) can be a child of a layout. All of the
layouts inherit from ViewGroup (which inherits from View) so you can nest
layouts. You could also create your own custom layout by making a class
that inherits from ViewGroup.
The
standard Layouts are:
AbsoluteLayout
AbsoluteLayout
is based on the simple idea of placing each control at an absolute
position. You specify the exact x and y coordinates on the screen for
each control. This is not recommended for most UI development (in fact
AbsoluteLayout is currently deprecated) since absolutely positioning every
element on the screen makes an inflexible UI that is much more difficult to
maintain. Consider what happens if a control needs to be added to the UI.
You would have to change the position of every single element that is shifted
by the new control.
Here
is a sample Layout XML using AbsoluteLayout.
<AbsoluteLayout xmlns:android="http://schemas.android.com/apk/res/android"
android:layout_width="fill_parent"
android:layout_height="fill_parent">
<Button
android:id="@+id/backbutton"
android:text="Back"
android:layout_x="10px"
android:layout_y="5px"
android:layout_width="wrap_content"
android:layout_height="wrap_content" />
<TextView
android:layout_x="10px"
android:layout_y="110px"
android:text="First Name"
android:layout_width="wrap_content"
android:layout_height="wrap_content" />
<EditText
android:layout_x="150px"
android:layout_y="100px"
android:width="100px"
android:layout_width="wrap_content"
android:layout_height="wrap_content" />
<TextView
android:layout_x="10px"
android:layout_y="160px"
android:text="Last Name"
android:layout_width="wrap_content"
android:layout_height="wrap_content" />
<EditText
android:layout_x="150px"
android:layout_y="150px"
android:width="100px"
android:layout_width="wrap_content"
android:layout_height="wrap_content" />
</AbsoluteLayout>
Note how
each element has android:layout_x and android:layout_y specified. Android
defines the top left of the screen as (0,0) so the layout_x value will move the
control to the right, and the layout_y value will move the control down. Here
is a screenshot of the layout produced by this XML.

FrameLayout
FrameLayout is designed to display a single item at a time.
You can have multiple elements within a FrameLayout but each element will be
positioned based on the top left of the screen. Elements that overlap will be
displayed overlapping. I have created a simple XML layout using FrameLayout
that shows how this works.
<FrameLayout
android:layout_width="fill_parent"
android:layout_height="fill_parent"
xmlns:android="http://schemas.android.com/apk/res/android">
<ImageView
android:src="@drawable/icon"
android:scaleType="fitCenter"
android:layout_height="fill_parent"
android:layout_width="fill_parent"/>
<TextView
android:text="Learn-Android.com"
android:textSize="24sp"
android:textColor="#000000"
android:layout_height="fill_parent"
android:layout_width="fill_parent"
android:gravity="center"/>
</FrameLayout>
Here is the result of this XML.

You can see I had both the ImageView and TextView fill the
parent in both horizontal and vertical layout. Gravity specifies where the text
appears within its container, so I set that to center. If I had not set a
gravity then the text would have appeared at the top left of the screen.
FrameLayout can become more
useful when elements are hidden and displayed programmatically. You can use the
attribute android:visibility in the XML to hide specific elements. You can call
setVisibility from the code to accomplish the same thing. The three available
visibility values are visible, invisible (does not display, but still takes up
space in the layout), and gone (does not display, and does not take space in
the layout).
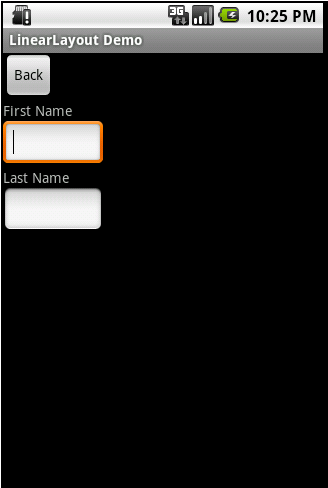
LinearLayout
LinearLayout organizes
elements along a single line. You specify whether that line is verticle or
horizontal using android:orientation. Here is a sample Layout XML using
LinearLayout.
<LinearLayout xmlns:android="http://schemas.android.com/apk/res/android"
android:orientation="horizontal"
android:layout_width="fill_parent"
android:layout_height="fill_parent">
<Button
android:id="@+id/backbutton"
android:text="Back"
android:layout_width="wrap_content"
android:layout_height="wrap_content" />
<TextView
android:text="First Name"
android:layout_width="wrap_content"
android:layout_height="wrap_content" />
<EditText
android:width="100px"
android:layout_width="wrap_content"
android:layout_height="wrap_content" />
<TextView
android:text="Last Name"
android:layout_width="wrap_content"
android:layout_height="wrap_content" />
<EditText
android:width="100px"
android:layout_width="wrap_content"
android:layout_height="wrap_content" />
</LinearLayout>
Here is a screenshot of the result of the above XML.
Here is a screenshot of the same XML except that the
android:orientation has been changed to horizontal.


RelativeLayout
RelativeLayout lays out elements based on their
relationships with one another, and with the parent container. This is arguably
the most complicated layout, and we need several properties to actually get the
layout we want.
Relative To Container
These properties will layout
elements relative to the parent container.
android:layout_alignParentBottom – Places the bottom of the
element on the bottom of the container
android:layout_alignParentLeft – Places the left of the
element on the left side of the container
android:layout_alignParentRight – Places the right of the
element on the right side of the container
android:layout_alignParentTop – Places the element at the
top of the container
android:layout_centerHorizontal – Centers the element
horizontally within its parent container
android:layout_centerInParent – Centers the element both
horizontally and vertically within its container
android:layout_centerVertical – Centers the element
vertically within its parent container
Relative To Other Elements
These properties allow you to
layout elements relative to other elements on screen. The value for each of
these elements is the id of the element you are using to layout the new
element. Each element that is used in this way must have an ID defined using
android:id=”@+id/XXXXX” where XXXXX is replaced with the desired id. You use
“@id/XXXXX” to reference an element by its id. One thing to remember is that
referencing an element before it has been declared will produce an error.
android:layout_above – Places the element above the
specified element
android:layout_below – Places the element below the
specified element
android:layout_toLeftOf – Places the element to the left of
the specified element
android:layout_toRightOf – Places the element to the right
of the specified element
Alignment With Other Elements
These properties allow you to
specify how elements are aligned in relation to other elements.
android:layout_alignBaseline – Aligns baseline of the new
element with the baseline of the specified element
android:layout_alignBottom – Aligns the bottom of new
element in with the bottom of the specified element
android:layout_alignLeft – Aligns left edge of the new
element with the left edge of the specified element
android:layout_alignRight – Aligns right edge of the new
element with the right edge of the specified element
android:layout_alignTop – Places top of the new element in
alignment with the top of the specified element
Here is a sample XML Layout
<RelativeLayout
android:layout_width="fill_parent"
android:layout_height="fill_parent"
xmlns:android="http://schemas.android.com/apk/res/android">
<Button
android:id="@+id/backbutton"
android:text="Back"
android:layout_width="wrap_content"
android:layout_height="wrap_content" />
<TextView
android:id="@+id/firstName"
android:text="First Name"
android:layout_width="wrap_content"
android:layout_height="wrap_content"
android:layout_below="@id/backbutton" />
<EditText
android:width="100px"
android:layout_width="wrap_content"
android:layout_height="wrap_content"
android:layout_toRightOf="@id/firstName"
android:layout_alignBaseline="@id/firstName" />
<TextView
android:id="@+id/lastName"
android:text="Last Name"
android:layout_width="wrap_content"
android:layout_height="wrap_content"
android:layout_below="@id/firstName" />
<EditText
android:width="100px"
android:layout_width="wrap_content"
android:layout_height="wrap_content"
android:layout_toRightOf="@id/lastName"
android:layout_alignBaseline="@id/lastName" />
</RelativeLayout>
Here is the screen produced by that XML.

I wanted to show this to you because the first time I made a
RelativeLayout I did exactly this and then looked at the screen and said, “Hang
on a minute, that’s not what I wanted!” The problem here is that when Android
draws the TextView lastName below the TextView firstName it only sets aside the
space it needs for the TextView. Android only reads the Layout XML one time so
it doesn’t know that an EditView is the next item and doesn’t plan for it. So
when the EditView is drawn to the right of the TextView it only has the height
of the TextView to work with so it overlaps the EditView above it. Here is the
Layout XML I wrote to create the form the way it should look.
<RelativeLayout
android:layout_width="fill_parent"
android:layout_height="fill_parent"
xmlns:android="http://schemas.android.com/apk/res/android">
<Button
android:id="@+id/backbutton"
android:text="Back"
android:layout_width="wrap_content"
android:layout_height="wrap_content" />
<TextView
android:id="@+id/firstName"
android:text="First Name"
android:layout_width="wrap_content"
android:layout_height="wrap_content"
android:layout_below="@id/backbutton" />
<EditText
android:id="@+id/editFirstName"
android:width="100px"
android:layout_width="wrap_content"
android:layout_height="wrap_content"
android:layout_toRightOf="@id/firstName"
android:layout_below="@id/backbutton"/>
<EditText
android:id="@+id/editLastName"
android:width="100px"
android:layout_width="wrap_content"
android:layout_height="wrap_content"
android:layout_below="@id/editFirstName"
android:layout_alignLeft="@id/editFirstName"/>
<TextView
android:id="@+id/lastName"
android:text="Last Name"
android:layout_width="wrap_content"
android:layout_height="wrap_content"
android:layout_toLeftOf="@id/editLastName"
android:layout_below="@id/editFirstName" />
</RelativeLayout>
You probably noticed that I had to rearrange the elements in
the XML since, as I already mentioned, you cannot reference an element that has
not already been laid out. Here is what the updated RelativeLayout produces.

Nested Layouts do not have to be of one type. I
could, for example, have a LinearLayout as one of the children in a
FrameLayout.
TableLayout
TableLayout organizes content into rows and columns.
The rows are defined in the layout XML, and the columns are determined
automatically by Android. This is done by creating at least one column for each
element. So, for example, if you had a row with two elements and a row with
five elements then you would have a layout with two rows and five columns.
You can specify that an element should occupy more
than one column using android:layout_span. This can increase the total column
count as well, so if we have a row with two elements and each element has
android:layout_span=”3″ then you will have at least six columns in your table.
By default, Android places each element in the first
unused column in the row. You can, however, specify the column an element
should occupy using android:layout_column.
Here is some sample XML using TableLayout.
<TableLayout
android:layout_width="fill_parent"
android:layout_height="fill_parent"
xmlns:android="http://schemas.android.com/apk/res/android">
<TableRow>
<Button
android:id="@+id/backbutton"
android:text="Back"
android:layout_width="wrap_content"
android:layout_height="wrap_content" />
</TableRow>
<TableRow>
<TextView
android:text="First Name"
android:layout_width="wrap_content"
android:layout_height="wrap_content"
android:layout_column="1" />
<EditText
android:width="100px"
android:layout_width="wrap_content"
android:layout_height="wrap_content" />
</TableRow>
<TableRow>
<TextView
android:text="Last Name"
android:layout_width="wrap_content"
android:layout_height="wrap_content"
android:layout_column="1" />
<EditText
android:width="100px"
android:layout_width="wrap_content"
android:layout_height="wrap_content" />
</TableRow>
</TableLayout>
This is the result of that XML.

No comments:
Post a Comment